Redux 基本使用
整理自黑马视频
核心内容:
redux用于在react中管理状态 (脱离组件树的传递关系, 在全局维护数据).redux可以脱离react独立使用.
Vue下的Pinia也有相似的功能.
早些时候, 这类状态数据管理的模块总感觉不需要, 但似乎在特殊场景下还是非常重要的. 例如需要实时显示数据时, 必要时, 请求数据消耗的时间在部分应用场景下是硬伤, 例如涉及到客服系统, 需要保持用户信息, 并在多个页面模块中切换时, 缓存的数据比起每次页面加载就发起
HTTP请求就很有必要.
1. 核心用法
核心功能的基本组成:
- 需要提供一个
reducer纯函数, 来返回一个全新的状态数据 (数据不可变特性), 依赖于一个action对象来进行处理如何返回状态数据. redux提供方法Redux.createStore(reducerFn)来创建存储对象.- 存储对象提供三个方法:
subscribe(fn)订阅更新. 凡是状态发生变化, 该方法订阅的函数就会被调用. 有点事件响应的味道.dispatch(action)派发任务.reducer函数会定义如何根据action来返回状态, 而dispatch就是在派发action. 有点触发什么事件的味道.getState()获得最新状态.
redux核心模块的时候一不再被推荐.
使用步骤说明:
npm create vite@latest
npm i redux
使用
Vanilla模板, 使用TypeScript.
基本使用步骤:
- 根据所需状态数据定义
reducer函数, 来返回状态数据. - 从
redux中导入createStore(), 传入reducer函数, 创建Store对象. - 订阅变更, 定义数据更新处理函数.
- 在需要数据变更的地方调用
dispatch, 发送action.
const reductor = (state: Object, action: Action) => {
  // 根据 action 中的 type 来确定怎么返回状态对象
  return 状态数据对象
}
import { createStore } from 'redux'
const store = createStore(reducer)

store.subscribe(() => {
  console.log(`状态数据发生变更: %O`, store.getState())
})

// 在需要更新的地方调用
store.dispatch({ type: '预先定义好的 action type' })
1.1 对比 Pinia 的独立使用
实际上 Vue 的 Pinia 也可以独立使用, 并且提供了响应式数据 (不用注册事件, 调用方法来获取).
基本使用步骤:
- 安装
pinia - 导入
defineStore, 定义useStoreXXX方法, 来提供响应式状态对象与操作方法 (state,gettersactions). - 导入
createPinia, 实例化pinia对象. - 在使用前, 调用
useStoreXXX方法获得Store实例. 注意, 如果是独立与Vue使用要将pinia实例作为参数传入. - 在需要更新时直接调用
actions中的方法. - 在需要获得响应式数据时, 直接访问
state中的属性, 或getters中的计算属性.
import { defineStore, createPinia } from 'pinia'

const useCounterStore = defineStore('counter', {
  state: () => ({
    count: 0
  }),
  actions: {
    increment() {
      this.count++
    },
  }
})

const counterStore = useCounterStore(pinia)

// 需要变更时
counterStore.increment()

// 需要获得最新状态数据时, 直接使用
counterStore.count
2. 与 React 集成
官方不推荐直接使用 Redux 来进行状态管理. 而是推荐使用 Redux Toolkit (又被称为 RTK) 与 react-redux 来实现, 其中:
Redux Toolkit封装了必要的方法与工具. 目的是简化定义, 并提供一套约定的模板.react-redux则提供了与组件通信的方法. 它提供了Provider组件, 来注入Store, 同时提供了一组Hook方法, 来获取/更新状态数据.
基本使用步骤:
- 特定的目录结构.
- 根据需要的状态数据, 定义模块.
- 使用一个通用的模块导出
store. - 使用
Provider注入store. - 需要使用数据时, 利用
useSelector来获得对应模块的状态对象. - 需要更新数据时, 导入
actionCreater(模块中定义), 使用useDispatch()得到的dispatch()方法, 来发送更新请求.
2.1 准备
安装包:
npm i @reduxjs/toolkit react-redux
约定的目录结构:
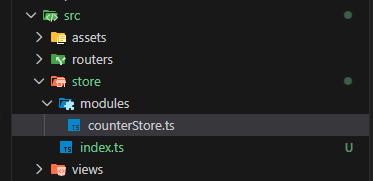
在 modules 中为不同的状态数据进行定义, 在 index.ts 中全局导出.
2.2 定义模块
模块针对一个状态对象, 它提供了一组 actionCreater 来触发更新的动作, 以及一个 reducer 来提供对外的能力. 定义包括:
state的类型, 并导出. 便于在外部使用时, 对类型进行注解 (非 TS 不用考虑).state的初始数据. 考虑到尽可能使用推断的类型, 而不是显式的定义类型,state的初始值需要单独定义.- 从
@reduxjs/toolkit导入createSlice, 来创建一个slice实例:- 定义该
slice的名字name. - 定义
initialState(直接使用上一步中的初始数据). - 定义
reducers对象, 其中包含更新状态的方法. 参数action需要使用PayloadAction<T>描述, 如果有参数的话.
- 定义该
- 从
slice实例的actions属性导出actionCreater, 以便在外部更新状态时使用. - 从
slice实例中默认导出reducer, 这是需要在根配置的工具.
import { createSlice, type PayloadAction } from '@reduxjs/toolkit'
// 导出状态类型
export interface CounterState {
  count: number
}
// 初始状态
const initialState: CounterState = {
  count: 0,
}
const slice = createSlice({
  name: 'counterStore',
  initialState,
  reducers: {
    increment: (state) => {
      state.count += 1
    },
    incrementByAmount: (state, action: PayloadAction<number>) => {
      state.count += action.payload
    },
  },
})

// actionCreater 方法
export const { increment, incrementByAmount } = slice.actions

export default slice.reducer
2.3 统一装配
根据不同的状态数据, 定义不同的 slice 模块. 然后按照约定模式, 统一在 store 根目录下定义全局的 store 对象, 来对外导出功能. 基本步骤:
- 从
@reduxjs/toolkit导入configureStore方法, 以便创建全局store实例. - 从各个模块导入对应的
reducer. 就是每个模块默认导出的内容. - 调用
configureStore获得store实例. 参数中, 初始化reducers对象, 里面放置所有的模块对应的reducer. - 默认导出
store实例, 以供外部使用. - 如果是使用
TS, 可以基于类型判断, 在导出全局状态类型.
import { configureStore } from '@reduxjs/toolkit'
import counterStore from './modules/counterStore'

const store = configureStore({
  reducer: {
    counterStore,
  },
})

export default store
export type RootState = ReturnType<typeof store.getState>
注意:
- 如果使用
typeof 函数, 那么返回的是函数的类型. - 如果使用
ReturnType<typeof 函数>, 那么得到的是函数返回值的类型.
这里全局推断 RootState, 会根据代码的更新 (添加新的 slice, 或更新状态数据等) 自动调整.
3.4 注入到 React 组件中
要在 react 组件中使用, 还需要将全局的 store 注入到组件中. 一般会注入到根组件中.
- 从
react-redux导入Provider组件. - 导入全局的
store实例. - 在
main.ts中, 更新根组件.
...
import { Provider } from 'react-redux'
import store from '@/store'
...

createRoot(document.getElementById('root')!).render(
  <StrictMode>
    <Provider store={store}>
      <ConfigProvider locale={zhCN}>
        <App>
          <RouterProvider router={router} />
        </App>
      </ConfigProvider>
    </Provider>
  </StrictMode>,
)
3.5 在组件中使用
react 中所有的操作都是通过 hook 来实现, 使用 redux 也是基于 hook. react-redux 提供两个方法:
- 一个是
useSelector()用于获得模块的状态数据 (注意, 该数据是响应式的). - 一个是
useDispatch()用于更新数据. 在redux中只有dispatch()行为才可以更新状态.
基本步骤:
- 导入
useSelector和useDispatch.useSelector<TState, TSelected>有两个类型:- 一个是全局状态类型, 使用
RootState注解. - 另一个是导出的 (选中的) 状态数据类型. 这便是每一个模块
slice中导出的状态类型.
- 一个是全局状态类型, 使用
- 从对应模块中导入
actionCreater, 在更新调用dispatch()时传入.
import { Button, Space } from 'antd'
import {
  increment,
  incrementByAmount,
  type CounterState
} from '@/store/modules/counterStore'
import { useDispatch, useSelector } from 'react-redux'
import type { RootState } from '@/store'

const TestPage = () => {

  const { count } = useSelector<RootState, CounterState>(
    state => state.counterStore
  )
  const dispatch = useDispatch()

  return <>
    <h1 className="text-2xl font-bold text-red-500">Hello React</h1>
    <div className="my-4">
      <Space>
        <div>{ count }</div>
        <Button onClick={() => dispatch(increment())}>增加按钮1</Button>
        <Button onClick={() => dispatch(incrementByAmount(20))}>增加按钮2</Button>
      </Space>
    </div>
  </>
}
export default TestPage
如果仅仅使用状态数据中的某一个属性, 也可以这么写, 省略了复杂的类型标注:
const count = useSelector<RootState, number>(
  state => state.counterStore.count
)
官方文档还给出一个建议, 一方面是避免每次导入 useSelector 的时候都去标注类型, 另一方面也是为了减少错误.
- 首先在
store全局配置文件中导出两个类型, 一个RootState, 一个AppDispatch. - 然后定义
hoots.ts文件, 对useDispatch和useSelector进行带注解的封装. - 然后使用的时候直接使用带注解的新方法.
import { createSlice } from '@reduxjs/toolkit'
const slice = createSlice({
  name: 'counterStore',
  initialState: { count: 0, },
  reducers: {
    increment: state => { state.count += 1 },
    decrement: state => { state.count -= 1 },
  },
})

export const { increment, decrement } = slice.actions
export default slice.reducer
import { configureStore } from '@reduxjs/toolkit'
import counterStore from './modules/counterStore'

const store = configureStore({
  reducer: {
    counterStore,
  },
})

export default store
// 从 store 本身推断出 `RootState` 和 `AppDispatch` 类型
export type RootState = ReturnType<typeof store.getState>
export type AppDispatch = typeof store.dispatch
import {
  type TypedUseSelectorHook,
  useDispatch,
  useSelector
} from 'react-redux'
import type { RootState, AppDispatch } from './store'

// 在整个应用程序中使用,而不是简单的 `useDispatch` 和 `useSelector`
export const useAppDispatch: () => AppDispatch = useDispatch
export const useAppSelector: TypedUseSelectorHook<RootState> = useSelector
import { Button, Space } from 'antd'
import { increment, decrement } from '@/store/modules/counterStore'
import { useAppDispatch, useAppSelector } from '@/store/hooks'

const TestPage = () => {
  const count = useAppSelector(state => state.counterStore.count)
  const dispatch = useAppDispatch()

  return <>
    <h1 className="text-2xl font-bold text-red-500">Hello React</h1>

    <div className="my-4">
      <Space>
        <Button onClick={() => dispatch(decrement())}>-</Button>
        <div>{ count }</div>
        <Button onClick={() => dispatch(increment())}>+</Button>
      </Space>
    </div>
  </>
}
export default TestPage
如此可以减少很多类型的定义.
3.6 异步调用
在 redux 中, dispatch 是一个同步方法, 要实现异步的处理, 进需要在异步函数中, 同步的调用 dispatch 即可. 例如:
const asyncHandler = async () => {
  console.log('start')
  await new Promise(resolve => {
    setTimeout(() => { resolve(null) }, 1000)
  })
  dispatch(decrement())
  console.log('end');
}
...
<Button onClick={() => asyncHandler()}>-</Button>