Ollama 文档
整理于 2026年1月30日, 文档地址: https://docs.ollama.com/
差不多一年没用了, 变化挺大. 曾经需要配置文件, 环境变量等设置的内容现在提供了一个
app完美解决.
文档分为两部分:
- 文档. 基本是介绍
Ollama这个工具的使用. - API 参考.
Ollama启动后会在本地启动一个 HTTP 服务, 可以通过 API 来调用模型的能力.
Ollama 是一个获取并运行大模型的工具.
就是本地部署大模型的一个工具.
1. 快速开始
1.1 安装
首先是安装:
- Win 下载安装即可. 它会安装一个本地服务, 以及一个客户端.
- Mac 下也是下载安装.
- Linux 则是执行一条命令:
curl -fsSL https://ollama.com/install.sh | sh
安装会使用默认的位置, 如果想要修改安装位置, 需要使用命令行运行:
OllamaSetup.exe /DIR="d:\some\location". 所指定文件夹就是安装二进制文件的路径. 不会自动创建其他文件夹.
早期
Ollama不会自动设置环境变量, 这里最好确保设置环境变量, 以便在命令行可以使用它.
获取帮助使用 ollama --help
PS C:\Users\jk> ollama --help
Large language model runner

Usage:
  ollama [flags]
  ollama [command]

Available Commands:
  serve       Start ollama
  create      Create a model
  show        Show information for a model
  run         Run a model
  stop        Stop a running model
  pull        Pull a model from a registry
  push        Push a model to a registry
  signin      Sign in to ollama.com
  signout     Sign out from ollama.com
  list        List models
  ps          List running models
  cp          Copy a model
  rm          Remove a model
  launch      Launch an integration with Ollama
  help        Help about any command

Flags:
  -h, --help      help for ollama
  -v, --version   Show version information

Use "ollama [command] --help" for more information about a command.
新版安装完成后还带有一个客户端, 并且在系统托盘中会有一个羊驼图标.
所有的设置可以在客户端中设置, 这个设置会将配置写入本地的 sqlite 文件中. 早期需要自己配置环境变量. 要查看可用的环境变量, 使用命令: ollama serve --help
PS C:\Users\jk> ollama serve --help
Start ollama

Usage:
  ollama serve [flags]

Aliases:
  serve, start

Flags:
  -h, --help   help for serve

Environment Variables:
      OLLAMA_DEBUG               Show additional debug information (e.g. OLLAMA_DEBUG=1)
      OLLAMA_HOST                IP Address for the ollama server (default 127.0.0.1:11434)
      OLLAMA_CONTEXT_LENGTH      Context length to use unless otherwise specified (default: 4096)
      OLLAMA_KEEP_ALIVE          The duration that models stay loaded in memory (default "5m")
      OLLAMA_MAX_LOADED_MODELS   Maximum number of loaded models per GPU
      OLLAMA_MAX_QUEUE           Maximum number of queued requests
      OLLAMA_MODELS              The path to the models directory
      OLLAMA_NUM_PARALLEL        Maximum number of parallel requests
      OLLAMA_NOPRUNE             Do not prune model blobs on startup
      OLLAMA_ORIGINS             A comma separated list of allowed origins
      OLLAMA_SCHED_SPREAD        Always schedule model across all GPUs
      OLLAMA_FLASH_ATTENTION     Enabled flash attention
      OLLAMA_KV_CACHE_TYPE       Quantization type for the K/V cache (default: f16)
      OLLAMA_LLM_LIBRARY         Set LLM library to bypass autodetection
      OLLAMA_GPU_OVERHEAD        Reserve a portion of VRAM per GPU (bytes)
      OLLAMA_LOAD_TIMEOUT        How long to allow model loads to stall before giving up (default "5m")
1.2 运行模型
运行模型可以先下载, 或直接运行, 第一次会自动下载.
这套命令的使用, 与 Docker 极为相似. 包括运行, 拉取模型, 查看本地模型, 删除, 甚至连
Modelfile也有.
可使用云端模型. 使用云端算力很方便. 但是需要注册. 有免费的 token 可以使用.
ollama run <模型名>
可用模型参考: https://ollama.com/models
运行起来后, 直接在终端就可以进行对话了. 退出终端使用 /bye 命令.
同时还支持接口, Python, 和 JavaScript.
1.2.1 使用接口 (cURL)
首先拉取模型. 记得确保本地 http 服务可以使用 (一般默认安装后会在开机自动运行).
ollama pull <模型名>
然后终端执行:
curl http://localhost:11434/api/chat -d '{
  "model": "模型名",
  "messages": [{
    "role": "user",
    "content": "Hello there!"
  }],
  "stream": false
}'
1.2.2 使用 Python
基本步骤:
- 拉取模型 (确保本地 http 可用)
- 安装
ollama - 编写代码
安装命令:
pip install ollama
参考代码:
from ollama import chat
from ollama import ChatResponse

response: ChatResponse = chat(model='模型名', messages=[
  {
    'role': 'user',
    'content': 'Why is the sky blue?',
  },
])
print(response['message']['content'])
# or access fields directly from the response object
print(response.message.content)
1.2.3 使用 JavaScript (Node)
基本步骤与 Python 一样:
- 拉取模型
- 安装
npm包 (ollama) - 编写代码
import ollama from 'ollama'

const response = await ollama.chat({
  model: '模型名',
  messages: [{ role: 'user', content: 'Why is the sky blue?' }],
})
console.log(response.message.content)
代码中使用了
import,package.json中需要添加节点:"type": "module"
1.3 Coding
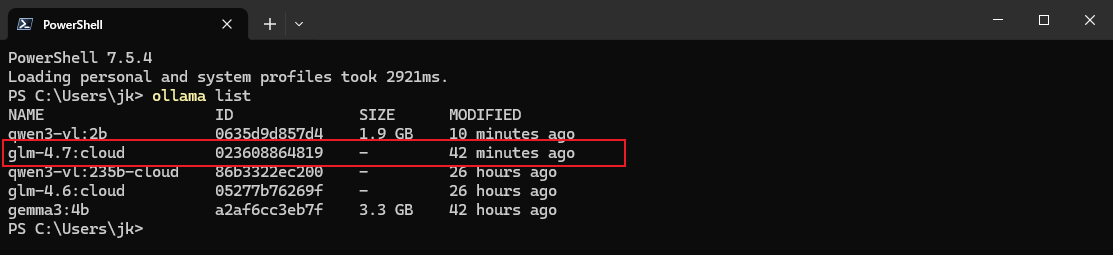
似乎它是 Ollama 0.15 之后提供的功能, 可以与其他编码工具集成. 官方推荐使用 glm-4.7-flash 模型, 但是需要 23G VRAM, 以及 64000 token 的上下文长度. 这里还是建议使用云端的模型:
ollama pull glm-4.7:cloud
然后再执行:
ollama launch
然后会提示选择需要集成的模块. 也可以直接运行时指定:
ollama launch claude --model glm-4.7:clound
或者配置, 但不运行
ollama launch claude --config
1.4 云
1.4.1 云模型
允许在本地接入云模型, 不需要本地的 GPU 支持. 但是需要注册 Ollama 账户. 并且 Token 有使用限制. 但是学习时够用的.
每天每 4 小时刷新一次 token 使用量, 每 4 天会清空一次总使用量.
要查看可用的模型, 可以访问: https://ollama.com/search?c=cloud
1.4.2 运行模型
基本步骤:
- 先要注册账户.
- 使用命令
ollama signin登录账户 (客户端会记录登录状态). - 运行云模型:
ollama run <模型名>. - 如果基于 API (Python 或 JavaScript) 则需要先拉取模型(不用运行):
ollama pull <模型名>.
参考流式代码:
from ollama import Client

client = Client()

messages = [
  {
    'role': 'user',
    'content': 'Why is the sky blue?',
  },
]

for part in client.chat('gpt-oss:120b-cloud', messages=messages, stream=True):
  print(part['message']['content'], end='', flush=True)
import { Ollama } from "ollama";

const ollama = new Ollama();

const response = await ollama.chat({
  model: "gpt-oss:120b-cloud",
  messages: [{ role: "user", content: "Explain quantum computing" }],
  stream: true,
});

for await (const part of response) {
  process.stdout.write(part.message.content);
}
1.4.3 使用云 API
本地不用安装 Ollama, 直接使用 ollama.com 的 Web API 也可以访问. 此时 ollama.com 相当于远程模型.
1.4.3.1 鉴权
基本步骤:
- 申请
API Key. - 设置环境变量
OLLAMA_API_KEY
也不是说非要设置环境变量, 当做一般的
token鉴权用即可. 逻辑上就是 OAuth 2.0 那一套.
详细操作:
去 Ollama 官网生成 API Key. 注意申请后只会完整显示一次, 需要妥善保存.
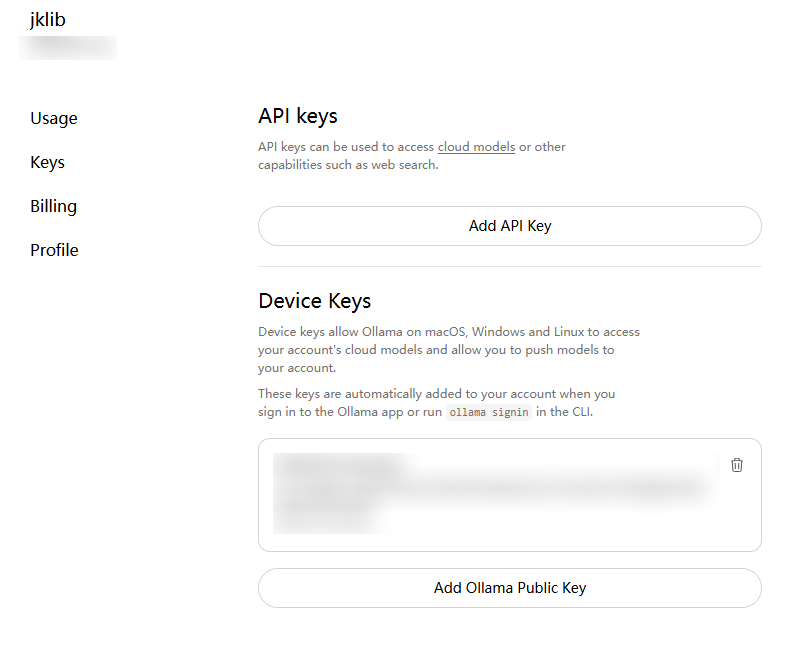
然后设置环境变量 OLLAMA_API_KEY=你申请的APIKey.
1.4.3.2 模型列表
访问: https://ollama.com/api/tags 可以查看可用云模型.
1.4.3.3 请求响应
可以使用:
- curl
- Node(JavaScript)
- Python
基本操作:
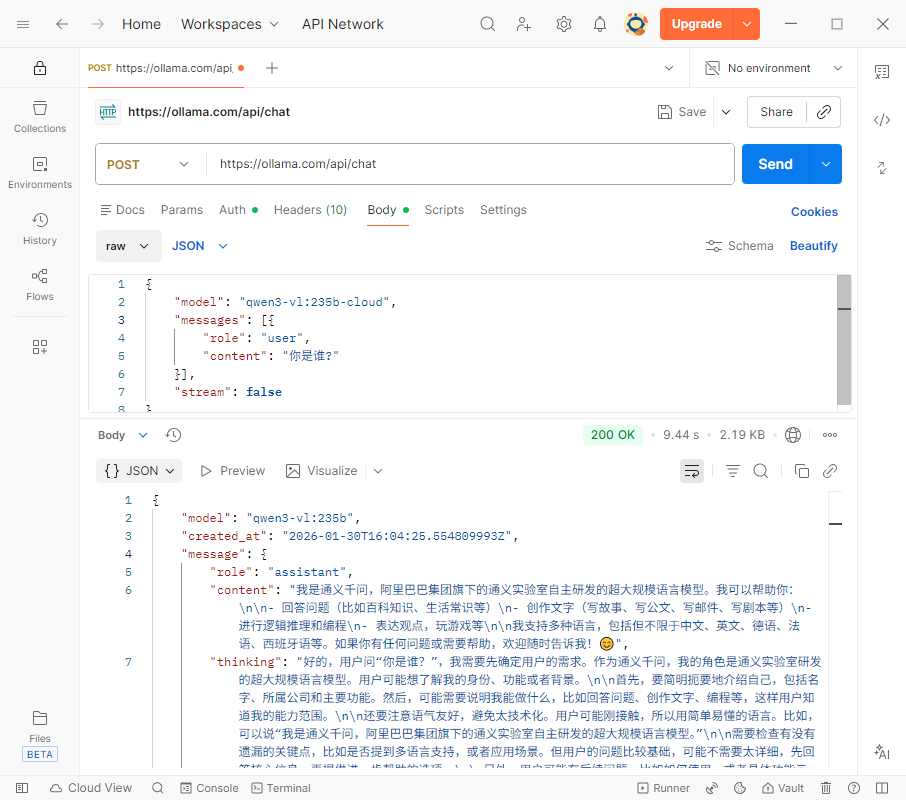
接口地址: https://ollama.com/api/chat
在请求头中添加
AUthorization: Bearer ApiKey发送 POST 请求
请求参数:
{
  "model": "模型名",
  "message": [{
    "role": "user",
    "content": "你是谁?"
  }],
  "stream": false
}
参考代码:
cURL
curl https://ollama.com/api/chat \
  -H "Authorization: Bearer $OLLAMA_API_KEY" \
  -d '{
    "model": "gpt-oss:120b",
    "messages": [{
      "role": "user",
      "content": "Why is the sky blue?"
    }],
    "stream": false
  }'
JavaScript 代码. 注意要先安装 npm 包: ollama
import { Ollama } from "ollama";

const ollama = new Ollama({
  host: "https://ollama.com",
  headers: {
    Authorization: "Bearer " + process.env.OLLAMA_API_KEY,
  },
});

const response = await ollama.chat({
  model: "gpt-oss:120b",
  messages: [{ role: "user", content: "Explain quantum computing" }],
  stream: true,
});

for await (const part of response) {
  process.stdout.write(part.message.content);
}
Python 代码, 也需要先安装 pip 包: ollama
import os
from ollama import Client

client = Client(
    host="https://ollama.com",
    headers={'Authorization': 'Bearer ' + os.environ.get('OLLAMA_API_KEY')}
)

messages = [
  {
    'role': 'user',
    'content': 'Why is the sky blue?',
  },
]

for part in client.chat('gpt-oss:120b', messages=messages, stream=True):
  print(part['message']['content'], end='', flush=True)
实际上直接可以使用 Postman 来发送请求. 需要配置 Bearer Token
2. 功能 (Capabilites)
粗略看了一下文档, 应该是对 编程的一些概念进行的说明与补充. 并且文档提供了一些开发上的交互的建议.
2.1 流 (Streaming)
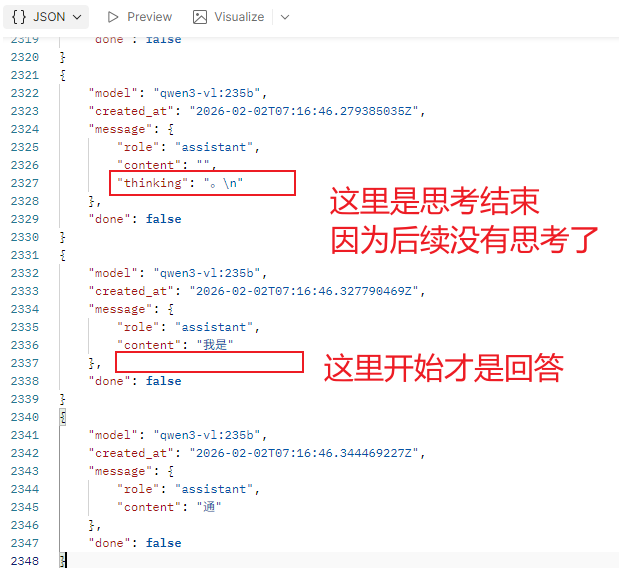
Streaming 允许在模型生成文本的同时进行渲染内容. 默认使用 REST API 调用时是开启的; 而使用 SDK 的时候默认是关闭的. 要手动开启, 只需要传入的参数中, 将 stream 设置为 True 即可.
如果不开启, 则直接返回字符串, 若开启会返回一个 带有时间顺序的的 JSON 对象, 来按照时间进行渲染. 代码中也会以异步的方式逐步返回 (异步迭代, for await of).
使用流返回的数据中可能存在三个属性:
content这是返回的内容thinking设置思考的内容 (不是每个模型都支持思考功能)tool_calls设置是需要进行特殊调用的内容 (有些模型不具备该功能, 需要单独调用后处理).
因启用流式返回后, 所有的数据需要积累收集处理.
返回类似于:
使用 API 来调用, 如果要让对话具备记忆功能, 需要积累收集前对话的返回, 作为新请求的参数.
这一点在参考代码中体现的很明显
Python 参考代码
from ollama import chat

stream = chat(
  model='qwen3',
  messages=[{'role': 'user', 'content': 'What is 17 × 23?'}],
  stream=True,
)

in_thinking = False # 根据是有有 thinking 来判断是不是思考, 进而显示思考与回答的提示文字.
content = '' # 积累收集内容(回答)
thinking = '' # 积累收集思考
for chunk in stream:
  if chunk.message.thinking:
    if not in_thinking:
      in_thinking = True
      print('Thinking:\n', end='', flush=True)
    print(chunk.message.thinking, end='', flush=True)
    # accumulate the partial thinking
    thinking += chunk.message.thinking
  elif chunk.message.content:
    if in_thinking:
      in_thinking = False
      print('\n\nAnswer:\n', end='', flush=True)
    print(chunk.message.content, end='', flush=True)
    # accumulate the partial content
    content += chunk.message.content

  # 新请求需要带上这个参数.
  # append the accumulated fields to the messages for the next request
  new_messages = [{ role: 'assistant', thinking: thinking, content: content }]
JavaScript 参考代码 (代码形式不同, 但基本逻辑与 Python 一模一样)
import ollama from 'ollama'

async function main() {
  const stream = await ollama.chat({
    model: 'qwen3',
    messages: [{ role: 'user', content: 'What is 17 × 23?' }],
    stream: true,
  })

  let inThinking = false
  let content = ''
  let thinking = ''

  for await (const chunk of stream) {
    if (chunk.message.thinking) {
      if (!inThinking) {
        inThinking = true
        process.stdout.write('Thinking:\n')
      }
      process.stdout.write(chunk.message.thinking)
      // accumulate the partial thinking
      thinking += chunk.message.thinking
    } else if (chunk.message.content) {
      if (inThinking) {
        inThinking = false
        process.stdout.write('\n\nAnswer:\n')
      }
      process.stdout.write(chunk.message.content)
      // accumulate the partial content
      content += chunk.message.content
    }
  }

  // append the accumulated fields to the messages for the next request
  new_messages = [{ role: 'assistant', thinking: thinking, content: content }]
}

main().catch(console.error)
2.2 思考 (Thinking)
具备思考的模型才会在返回的结果中包含 thinking 字段.
支持思考的模型可以使用 https://ollama.com/search?c=thinking 来搜索.
要启用与禁用思考的功能, 调用接口时传入参数可以添加一个 think 的字段, 是一个 boolean 类型, 控制是否需要思考功能.
使用命令行操作默认是启用思考的. 至于关闭, 经过测试似乎不太好用. 猜测需要特性模型.
示例 - 直接调用
curl http://localhost:11434/api/chat -d '{
  "model": "qwen3",
  "messages": [{
    "role": "user",
    "content": "How many letter r are in strawberry?"
  }],
  "think": true,
  "stream": false
}'
示例 - Python SDK
from ollama import chat

response = chat(
  model='qwen3',
  messages=[{'role': 'user', 'content': 'How many letter r are in strawberry?'}],
  think=True,
  stream=False,
)

print('Thinking:\n', response.message.thinking)
print('Answer:\n', response.message.content)
示例 - JavaScript SDK
import ollama from 'ollama'

const response = await ollama.chat({
  model: 'deepseek-r1',
  messages: [{ role: 'user', content: 'How many letter r are in strawberry?' }],
  think: true,
  stream: false,
})

console.log('Thinking:\n', response.message.thinking)
console.log('Answer:\n', response.message.content)
2.3 结构化输出 (Structured Outputs)
目的就是为了方便统一输出类型, 以便编程接口对接. 但经测试也不是很理想. 猜测需要特定模型. 略.
2.4 图像 (Vision)
具备可视化的模型可以接收文本参数也可以直接接收图像参数. 使用接口时直接使用 images 属性即可.
示例 - cURL
# 1. Download a sample image
curl -L -o test.jpg "https://upload.wikimedia.org/wikipedia/commons/3/3a/Cat03.jpg"

# 2. Encode the image
# base64 会为了方便查阅, 插入换行符
# tr -d '\n' 表示批量删除 换行符
IMG=$(base64 < test.jpg | tr -d '\n')

# 3. Send it to Ollama
curl -X POST http://localhost:11434/api/chat \
-H "Content-Type: application/json" \
-d '{
    "model": "gemma3",
    "messages": [{
    "role": "user",
    "content": "What is in this image?",
    "images": ["'"$IMG"'"]
    }],
    "stream": false
}'
示例 - Python
from ollama import chat
# from pathlib import Path

# Pass in the path to the image
path = input('Please enter the path to the image: ')

# You can also pass in base64 encoded image data
# img = base64.b64encode(Path(path).read_bytes()).decode()
# or the raw bytes
# img = Path(path).read_bytes()
# 可以是路径, base64字符串, 也可以是字节序列

response = chat(
  model='gemma3',
  messages=[
    {
      'role': 'user',
      'content': 'What is in this image? Be concise.',
      'images': [path],
    }
  ],
)

print(response.message.content)
示例 - JavaScript
import ollama from 'ollama'

const imagePath = '/absolute/path/to/image.jpg'
const response = await ollama.chat({
  model: 'gemma3',
  messages: [
    { role: 'user', content: 'What is in this image?', images: [imagePath] }
  ],
  stream: false,
})

console.log(response.message.content)
2.5 词嵌入 (Embeddings)
主要用于语义化搜索, 查询, 以及 RAG 的功能, 允许将需要的文本转换为词向量 (数字向量), 可以将其存储在向量数据库中, 也可以在 RAG 管道中使用, 一般检索会使用余弦相似度 (cosine similarity). 在基于 langchain 来构建 RAG 时可以使用.
实际上就是提供了一些模型, 允许将你输入的文本数据, 转换为词向量的功能.
[jk] 一些概念性的内容不太好解释.
推荐模型:
还有
mofanke/acge_text_embedding可以使用, 才 650M 左右.
使用示例 - CLI 直接使用
ollama run mofanke/acge_text_embedding:latest "你好"
也可以使用管道
echo "你好" | ollama run mofanke/acge_text_embedding:latest
使用示例 - cURL 直接调用
curl -X POST http://localhost:11434/api/embed \
  -H "Content-Type: application/json" \
  -d '{
    "model": "embeddinggemma",
    "input": "The quick brown fox jumps over the lazy dog."
  }'
注意接口的地址:
/api/embed.如果需要转换多个句子, 参数
input使用字符串列表即可.
使用示例 - Python
import ollama

single = ollama.embed(
  model='embeddinggemma',
  input='The quick brown fox jumps over the lazy dog.'
)
print(len(single['embeddings'][0]))  # vector length
要转换多个句子, 只需要传入的 input 是一个序列即可, 返回值类型不变:
import ollama

batch = ollama.embed(
  model='embeddinggemma',
  input=[
    'The quick brown fox jumps over the lazy dog.',
    'The five boxing wizards jump quickly.',
    'Jackdaws love my big sphinx of quartz.',
  ]
)
print(len(batch['embeddings']))  # number of vectors
使用示例 - JavaScript
import ollama from 'ollama'

const single = await ollama.embed({
  model: 'embeddinggemma',
  input: 'The quick brown fox jumps over the lazy dog.',
})
console.log(single.embeddings[0].length) // vector length
对应的多个句子
import ollama from 'ollama'

const batch = await ollama.embed({
  model: 'embeddinggemma',
  input: [
    'The quick brown fox jumps over the lazy dog.',
    'The five boxing wizards jump quickly.',
    'Jackdaws love my big sphinx of quartz.',
  ],
})
console.log(batch.embeddings.length) // number of vectors
注意:
- 大多数语义化检索会使用余弦相似度 (cosine similarity).
- 在生成索引, 以及检索的时候应该使用相同的词嵌入模型.